Black & White (with a little colour!) Christmas Cards

Hello! One of the big decorating trends this season seems to be a black and white based theme so I thought I would try this approach with a few Christmas cards, and of course the Stampin' Up! Peaceful Place 12" x 12" Specialty Designer Series Paper (item 156394) fits the bill perfectly!
The base of my first card (4 1/8" x 4 1/8") is Basic White Thick cardstock (item 159229). I used the Giving Gifts dies (item 156563) to cut Santa and his reindeer from a 3 7/8" square Basic White Thick cardstock panel, which I stamped with the "North Pole Delivery" sentiment from the Perfectly Plaid stamp set (item 158335) using Memento Tuxedo Black ink (item 132708). After stamping the sentiment I embossed the panel using the Subtle 3D Embossing Folder (item 151775 and currently available on the Clearance Rack). Behind Santa and his reindeer I added a piece of Peaceful Place DSP and splattered the front (and interior of the card - covering Santa and his reindeer on the front panel) using the Basic Gray watercolour pencil (Watercolour Pencils - Assortment 1 - item 141709) before adhering the white panel to a Basic Black cardstock (item 121045) panel. Before adhering the Basic Black panel to the card base I added the Black & White 1/4" Gingham Ribbon (item 156485). The "Merry Christmas" sentiment on the interior of the card (also from the Perfectly Plaid stamp set) was stamped in Black ink before I did the "splattering". The Peaceful Place DSP co-ordinating envelope was made using an envelope punch board, and has a silver cord bow (Simply Elegant Trim - item 155766).

For my second card (4 1/2" x 4 1/2") I have used Basic Black for the card base., with Basic White Thick cardstock panels for the front and interior, and Peaceful Place DSP. I used the Poinsettia dies (item 153522) to cut the flower (Real Red cardstock - item 102482), leaves (Mossy Meadow cardstock - item 133676; and Old Olive cardstock - item 100702), and sprigs (Basic Black). For the center of the flower I have used a gray button from my stash, tied with black embroidery floss.


I have used Basic White Thick cardstock for the card base of my third card, which measures 9" x 4", with panels of Basic Black cardstock and Basic Gray cardstock (item 121044). The "Merry Christmas" sentiment, from the Perfectly Plaid stamp set, has been stamped in Black ink on the Peaceful Place DSP panel. I wrapped the DSP horizontal strip near the bottom of the front panel with Black & White 1/4" Gingham Ribbon (item 156485), and added a dark red button from my stash with a black baker's twine bow (Baker's Twine Essentials Pack - item 155475).


For my fourth card (4 1/2" x 4 1/2") I used Basic White Thick cardstock for the base, and Basic Black and Basic Gray for the panels. I stamped the cabin, fox, and snowflakes, from the Peaceful Cabin stamp set (item 156395) with Black ink on Basic White cardstock. After stamping I embossed the panel using the Subtle 3D Embossing Folder (item 151775 - currently available on the Clearance Rack). The interior sentiment, also from the Peaceful Cabin stamp set, was also stamped using Black ink on Basic White cardstock. I used the Layering Circle dies (item 151770) to cut the sentiment circle and the scalloped circle opening in the Basic Gray panel (the scalloped circle from the frame was used to mat the sentiment circle).


The base of my fifth card (4" x 4") is also Basic White Thick cardstock, with Peaceful Place DSP used on the front and interior panels. I used the Stitched Triangles dies (item 152710) to cut the Christmas tree from Old Olive cardstock; the Stitched Rectangles dies (item 151820) to cut the tree trunk from Early Espresso cardstock (item 119686); the Layering Circle dies (item 151770) to cut the circle frame from Basic Black cardstock (which was lightly sponged with White ink (item 147277); the Pierced Blooms dies to cut the bow from Smoky Slate cardstock; the Giving Gifts dies (item 156563) to cut the snowflakes from Basic White cardstock; and the Stitched So Sweetly dies (item 151690) to cut the sentiment panel from Basic White cardstock. The sentiment, from the Peaceful Cabin stamp set, was stamped in Black ink, and after stamping the sentiment panel was embossed using the Tasteful Textile 3D Embossing Folder (item 152718). I added a Matte Black Dot (item 154284) to the center of the bow. A strip of Peaceful Place DSP was adhered to the right side of the back of the card base (mostly because I had to hide a small smear of ink!)

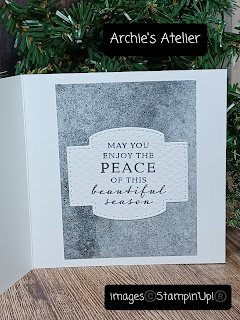

Basic Black cardstock has been used for the base of my final card (4" x 4"), with Basic White Thick cardstock for front and interior panels. I used the Layering Circle dies to cut the circle opening in the Peaceful Place DSP front panel (the circle was used behind the sentiment circle inside the card); the Basic Black scalloped frame; and the Basic White sentiment circle. The cabin image on the front of the card is a section cut from the Peaceful Place DSP. I used the Giving Gifts dies (item 156563) to cut the little bows from Real Red cardstock (item 102482). A Matte Black Dot (item 154284) was added to the center of the red bow on the front panel. The Peaceful Place DSP co-ordinating envelope was made using an envelope punch board, and has a silver cord bow (Simply Elegant Trim - item 155766).


I really enjoyed working on these cards and hope you are enjoying creating your Christmas cards too!
Thank you for visiting my blog! If you are interested in purchasing any of the available Stampin' Up! products that I have used in these projects, please do not hesitate to visit my online store found on my website, https://archiesatelier.stampinup.net/, or click under the "Shop With Me" tab on the right sidebar of my blog. I very much appreciate your business!
Have fun creating!
Laurel

I have my eye on you!
Comments
Post a Comment