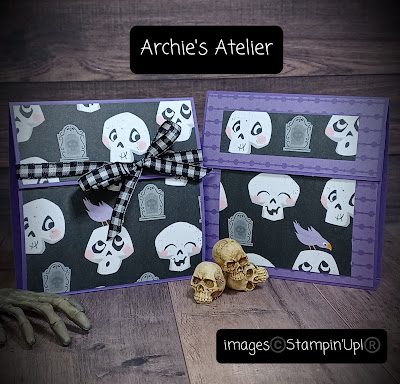
Quick & Easy Halloween Treat Holders With Stampin' Up! Cute Halloween 6" x 6" Designer Series Paper
Hello! Today I am sharing a quick and easy last-minute Halloween treat holder featuring Stampin' Up! Cute Halloween 6" x 6" Designer Series Paper (item 156479). These treat holders would be great for sharing a little Halloween treat at work or school.These treat holders were designed around the 3 " x 3" Zip-Lock Polybags that I picked up at Dollar Tree - these little bags will easily hold two mini chocolate bars or a fun-size Skittles or M & M's treat (is it just my imagination or do the mini Halloween chocolate bars get smaller every year . . .)
In addition to the 3" x 3" bags and Cute Halloween DSP I used the following supplies:- Basic Black cardstock (cs) - item 121045;
- Gorgeous Grape cs - item 146987;
- Granny Apple Green cs - item 146990;
- Pumpkin Pie cs - item 105117;
- 6" x 6" Designer Series Paper Assortments - Brights (item 155228) and Regals (item 155227) - I also used some of my leftover scraps of the DSP assortments from last year;
- Multi Purpose Liquid Glue (item 110755);
- Tear & Tape Adhesive (item 154031) - used to adhere the bag to the treat holder;
- orange/purple/black/gray/white buttons from my Dollar Tree/Dollarama button stash;
- white baker's twine (Baker's Twine Essentials Pak - item 155475);
- Black & White 1/4" Gingham Ribbon (item 156485); and
- black embroidery floss (six strands).
For the base of the treat holder the cs is cut 3 1/2" wide by 8 1/2" long, and then scored on the 8 1/2" side at 3"; 3 1/2"; and 7". I burnished each fold using a bone folder (item 102300).
The measurements for the base DSP for the front panels and the flap panels are: front panel - 3 3/8" wide by 2 7/8" tall; flap - 3 3/8" wide by 1 3/8" tall. In decorating the holders I just used scraps of co-ordinating DSP (or the flip side of the Cute Halloween DSP) over the base DSP.
For the closure of the holder I put three "circles" of the multi purpose liquid glue on the underside of the flap and let the glue dry: the glue will become clear but remain "tacky" and so when the flap is pushed down against the front panel the tacky glue will not provide a permanent bond - the flap will be repositionable, thereby allowing the treat holder to be opened easily without having to be ripped apart (depending of course on how desperate the recipient may be to get to the chocolate treat!)
A strip of the double sided tape is put on the back of the top of the little clear bag, and once the treat has been inserted in the bag the tape backing is removed and the bag secured in the treat holder with the top of the bag lined up under the fold line of the flap of the treat holder.
Thank you for visiting my blog! If you would like to purchase any of the Stampin' Up! supplies I have used in these projects, and you reside in Canada and do not have a Stampin' Up! demonstrator, please visit my website, https://archiesatelier.stampinup.net/ or click underneath the "Shop With Me" tab found on the right side bar of my blog.
Have fun creating and Happy Halloween!


Comments
Post a Comment